MOVE 'EM OUT
This section will explain the MOVE action; specifically by using the MOTION PATH button.
Insert/Import your Image and position it to the place where you want to start. Next, click the Motion path button (highlighted in yellow below) Slide the image to the next position.
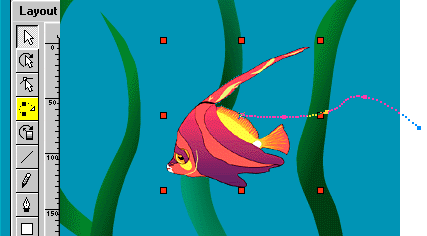
Adjust the MOVE EFFECT on the movie panel and test/play until the speed is satisfactory. - Repeat the above until the path is complete.

This next section will address the PLACE and IMAGE mouseover BUTTONS.
PLACE - To move an object from point A to Point B: Highlight Object. Click Actions - Place: when dialog box appears adjust X & Y settings, ROTATION if desired, etc.
ROLLOVER IMAGES - 1st, You will need to create 2 separate images, one for the mouseover effect and one for the mouseout effect. Insert the mouseout image. Next, with Object picked: Click INSERT BUTTON - an array similar to this will appear:
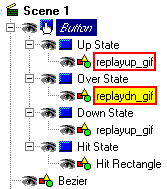
Notice the UP STATE (mouseOut) and the image (highlighted with red outline). Below it - Over State - is the mouseOver image that will replace the above. (yellow filled)
In your array both UP and OVER will have the same images. What we want to do is replace the OVER image.
1st, right-click the Over State image and cut or delete it. 2nd, highlight OVER STATE - Click Insert Image, & pick your mouseOver graphic.
Now we need to assign an action to it. Highlight BUTTON. Click Actions - Add Event: On (Press) - Add Action and pick what you want it to do.
Now, Run your movie and give it a test.
DOWNLOAD fish6.swi
< ZOOMOUT | INTRO | INTERACT | BLUR >

|